

 sprout
 Summary
An outline of techniques, skills, and knowledge needed to safely climb outdoors.
introduction
This guide hopes to eventually become the starting point to everything one needs to know to climb outdoors (boulder, trad, sport/lead, top rope, multi-pitch, rappelling., self-rescue techniques, and much more).
Outdoor climbing is one of those skills that is learned through practice, rather than reading a guide. My hope for this guide is just to list every skill one would need in one place, rather than acting as a replacement for real experience.
prerequisites
Although you could reasonably start climbing for the first time and have a good time in an outdoor setting (people have been doing it for thousands of years after all…), gyms are now so much safer and more accessible that I’d strongly recommend starting indoors.
Indoor climbing helps you develop your intuition and vocabulary for describing and executing on a variety of climbing situations. When you go outdoors, this will help tremendously with safety since you’ll be able to understand and explain to others what moves you’ll be making when scoping out a route, and build your protection systems in a way that’ll enable you to safely attempt (and possibly fall on) every individual move.
Some baseline bouldering and top-rope experience will be assumed from this point forwards. Lead climbing experience is optional, but will be helpful.
pre-climb checks
Everyone does this differently; here is one non-exhaustive checklist that could be followed. There are a few more things to check compared to gym checks.
A for anchors. are they completed and built with SERENE in mind? (have someone who didn’t build the anchor double-check.)
B for belay. are your harnesses tight + doubled back;
C for connectors. are all participants attached securely to the rope? are the knots tied correctly (with backup knots if required)? are carabiners locked and oriented the correct direction (no triaxial or cross loading)?
D for devices. do you have all the gear you need attached to you (cams, slings, quickdraws, carabiners…)? are your belay devices in order (brake line down, attached to a locked carabiner)? do your devices work as intended (hold tension and catch falls, raise/lower you when activated, etc)?
E for end-of-rope. Is your rope flaked + free of tangles? is it long enough for the climb? do you have a stopper knot in case it’s not long enough?
F/G for Feeling Good. do you trust your partner / is there anything else you need to communicate? do you have a plan and feel confident + safe for the climb? have you stretched/warmed up so you don’t get a random cramp halfway up the route? verbally confirm that everyone is ready to go (on belay/belay on, climbing/climb on, etc.)
H for helmet. Wear a helmet! make sure it’s MIPS-certified (and not some random bike helmet, although that is still better than nothing at all). when in doubt, retire it!
materials
ropes
Static vs. Dynamic Ropes
Most lead climbing ropes are considered dynamic because they stretch significantly under fall loads. This introduces an elastic force in the system, which can reduce the force exerted onto climbers and equipment.
Top ropes and anchor-building ropes are often chosen to be static (or semi-static) because the max force exerted on the rope is typically bodyweight or less. Static ropes allow for more precise positioning of equipment since they don’t stretch out that much under load.
carabiners
locking vs. non-locking
Locking carabiners are more secure because they require
- Prefer triple-locking carabiners for critical locations and situations where the load direction will be unexpected (such as attaching to your belay loop) since they are much less likely to be forced open.
loading patterns
Carabiners are typically rated for strength in two axes (primary and cross-loaded), and sometimes an open-gate strength.
Carabiners are by far the strongest when they are loaded on their vertical axis. Some carabiner shapes will help guide rope to fall into the correct place (like a D-shape). There also exist “anti-crossloading” carabiners that have an extra clip that’s typically used to secure your belay loop while belaying.
One dangerous pattern of loading is triaxial loading, where three ropes are each pulling in different and roughly equilateral directions. This can be seen most commonly in unsafe anchor setups and can be mitigated by reducing the angle between ropes/bolts, or using multiple carabiners.
knots
Knots are the primary way you work with ropes. They let you attach two ropes together, attach ropes to anchors/objects, attach yourself to ropes, attach ropes to carabiners, and much more.
bites
- A bite is the name for an enclosed loop of rope secured by a knot.
- Bites can be created by folding your rope in half, then tying a knot as if it were a single strand rather than two.
- You can also create double bites by folding your rope one more time (so that you combine a group of 4 strands together). This will create two loops and is great for situations where you need redundancy.
overhand
The simplest knot: the same as tying your shoe.
- Secure and self-tightening.
- Make a loop. Then pass one end of the rope through the loop.
- Great on its own as a stopper knot, or for tying a rope into things.
- Easy to create, tear down, and adjust.
- Easy to create bites/double-bites with.
The main problem of overhand knots is that it weakens the rope significantly— the rope loses 50-60% of its strength.
figure eight
- functionally equivalent to an overhand with some nicer properties:
- since it has more surface area, it reduces friction (and therefore weakens the rope by a lesser amount).
- Good way of tying a figure eight correctly every time:
 ️
️
- Make a loop and pretend it’s a snowman’s head.
- Take one end of the rope and wrap it around the head like a scarf. This rope must wrap entirely around, like a winter scarf; your knot won’t be correct if you wrap it halfway, like a soccer/football scarf.
- Pass the end you’re holding back through the head, like you’re poking a carrot nose into the snowman.
- A great figure eight knot will be well-dressed, meaning it should look symmetrical from all sides. This just takes experience/practice to get right, and can be helped by ensuring you’re never crossing over the first line during your follow through. Making a well-dressed knot helps distribute the load evenly, dissipates heat most effectively, and prevents potential slippage from your strands uncrossing each other.
- If you are having trouble loosening your figure-eights after overtightening them, start your follow-through the “hard way”: there will be a naturally “easy” opening to start the follow-through, but instead of taking it, push the original rope aside and insert it on the other” “hard” end.
clove hitch
- used to anchor a rope to a fixed object (like a tree or pole) by wrapping the rope around it.
- Needs backup! Leave extra tail to tie an overhand knot or two after the clove hitch to prevent slippage.
Prusik knot
- Looks like a fist. Used to attach a rope to a particular point on another rope.
- It’s a friction knot, so if you loosen it you can
- The amount of friction before it slips might be somewhat low (depending on knot tightness, rope properties, etc.), so you may want to make a double/triple Prusik knot to prevent slipping. However, these will be more
fisherman’s knot
- Use to connect two ropes together (or, two ends of the same rope to create a cordellette/loop).
- Self-tightening; if used substantially, could become practically permanent since it binds the rope together.
anchors
Anchors are necessary for
This blog post from Max (who I took an anchoring class from) provides a bunch of example anchors of various types: natural vs. sport, slings/cordellette vs rope, static vs self-equalizing. There is a near-infinite number of anchor variations, so rather than memorizing individual anchors, build up a solid intuition of what it means to assess an anchor’s effectiveness!
SERENE and SERELE
Aim to build your anchors to follow the rules of SERENE:
- Strong: Will the anchor hold for every possible load situation (see how ‘strong’ is your anchor?)
- Equalized: Does the anchor exert approximately the same force on each of the anchor points?
- Redunant: If the weakest point in the anchor (typically a knot) fails, will the system continue to be safe?
- Efficient: Is the anchor quick to set up and tear down without sacrificing quality and integrity? (for example, can you satisfy all the other SERENE requirements in 5 minutes or less?)
- No Extension: If the weakest point in the anchor fails, will the climber remain in the same location?
Having a no-extension anchor is only possible for static anchors. For self-equalizing anchors, you should instead aim for Limited Extension anchors that have a fixed maximum extension length (no more than 12 inches).
common mistakes
- the Death Triangle and related variants.
- attaching to redundant anchor points but combining them together at a single point of failure.
do you need a Self-Equalizing anchor?
There are two main classes of anchors: self-equalizing and static anchors.
Static anchors are simple and primarily effective in one direction of force (or sometimes both in the upwards/downwards directions of the same force vector, for multi-pitch compatible ones). They are best for simple top ropes, and most lead climbing routes where your last point of protection is fairly close to the anchor.
Self-equalizing anchors allow freedom of movement.
- Identify the range of motion needed for the climb prior to building the anchor.
- You will rarely ever need more than 6 inches of slack in the system! This already allows nearly 180 degrees of freedom; adding more slack will violate the ‘limited extension’ principle of SERELE.
Fall factors
The “fall factor” is equal to the ratio of the length of fall to the length of rope.
- A fall under full tension has fall factor 0 (virtually no additional force exerted from falling).
- The maximum fall factor under top rope is 1 (climber falls the entire length of the rope).
- The maximum fall factor on lead is 2 (climber past anchor point maxes out rope and falls double the length of the rope)
- Static falls (such as on a via ferrata route or slippage from a static anchor) can have higher fall factors (4+) and can easily cause equipment failure, so they should be avoided whenever possible.
how ‘strong’ is your anchor?
The strength of a protection system is usually measured in the number of kilonewtons (kN) of force it is expected to hold. One kN is approximately 225 U.S. pounds.
Dynamic loads (like taking a lead fall) can greatly exceed your body-weight’s worth of force, but should always be a small-ish percentage of your equipment’s maximum force rating. For example, a typical hard-catch lead fall generates 6-8 kN of force, but ropes are typically rated to 18 kN and carabiners to 20+ kN.
This blog post goes into equipment strength in more detail. I’ve stolen their spreadsheet below for convenient reference of rated/measured strength for various equipments and situations:
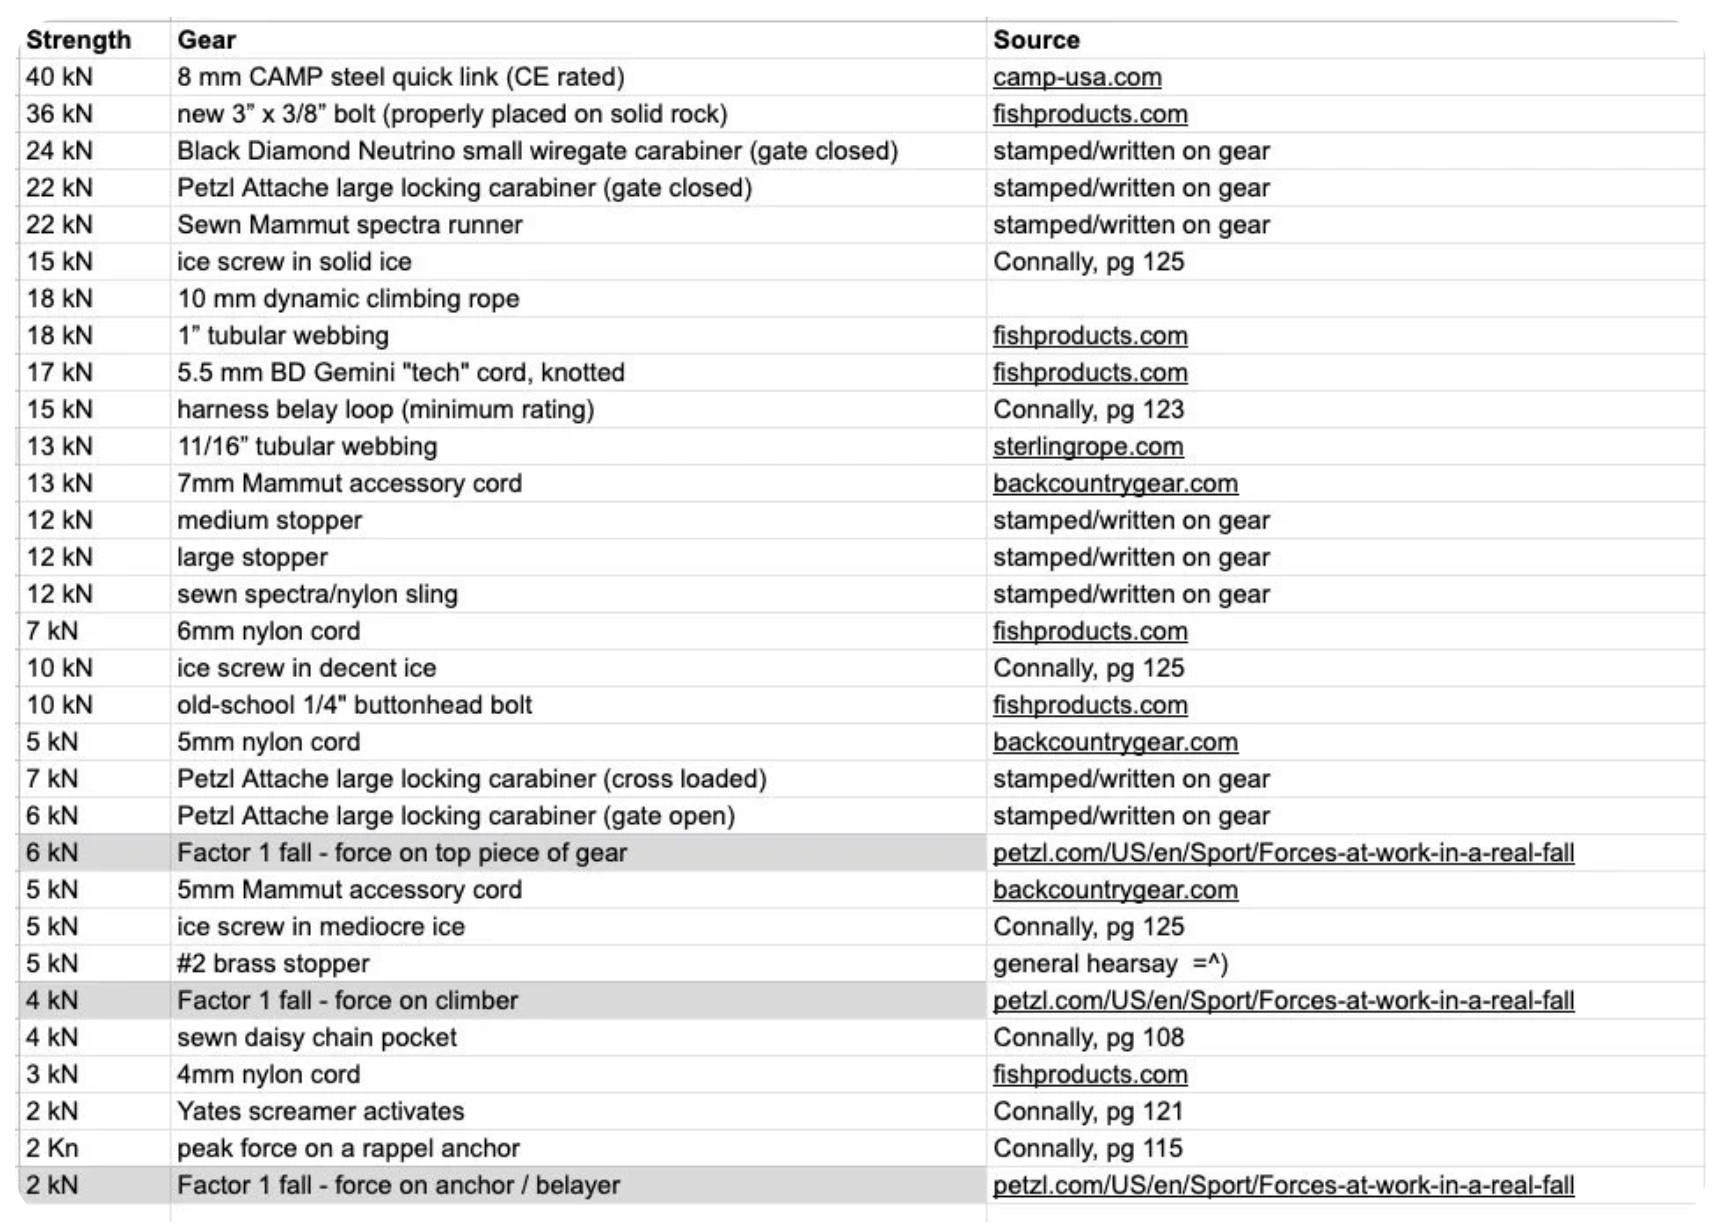
To assess the effective strength of an anchor system, you must identify the weakest link. For example, if you tie a rope (18 kN max) into two bolts (36 kN x 2 = 72 kN total) but then tie
- As a rule of thumb, strong anchors have a strength of over 20 kN, and are redundant. (For example, just anchoring onto a single 36 kN bolt doesn’t mean it’s SERENE.)
Knots are weak but necessary
Knots can weaken rope strength by 50% or more. This weakening effect is primarily caused by friction-induced heat, which loosens strands and can cause them to fail.
To reduce the weakening effect, you can use knots that have a larger surface area for heat dispersion. For example, a figure-eight knot only reduces strength by ~30% whereas a standard overhand knot reduces strength by 50%, since figure-eights are larger.
Why do some knots require redundancy, but others don’t? (You don’t usually tie redundant knots into your harness, for example, but require redundant knots inside anchor systems.)
- A very good heuristic to follow is “if you can’t touch it, make it redundant”. You can visually inspect and fix your harness tie-in or a Prusik friction hitch if it starts to slip, but you often can’t fix your anchor during a climb!
- This post is pretty good.
self rescue
TBD.